For some reason, this week, I wasn't able to make a Win32 pure or console application in VS2015. When I tried to type in a Project Name and a Solution Name (I was making a new solution at the time, with "Create directory for solution" checked.), I clicked ok, the dialog would disappear, but then reappear again (the same one).
I googled online. The only thing I found was this reddit post. There was no accepted solution. I found on my own that going to the "Programs and Features" window in the Control Panel, clicking my VS 2015 installation, clicking "Change", and clicking "Repair" in the VS installation dialog. VS apparently did a fresh reinstall, and it worked again.
=====
That worked for me in the first go, but the problem was that I was getting warnings that VS 2015 Redistributable (both x86 and x64 versions) were already installed. At face value, that's logically okay. As long as they existed, VS 2015 would run, but for some reason they weren't listed in my "Programs and Features" window, which was really mysterious to me.
I did a lot of searching about this. I found this forum post with an accepted answer saying that VS 2017 (which I had on my computer at the time, probably because of Unity) installs VS 2017 Redistributables with it that is sort of a "in-place upgrade" (I'm interpreting it as "minor upgrade") over the VS 2015 ones. It seems that registry keys may contribute to some installation programs interpreting the VS 2017 Redistributables as 2015 ones, causing the warnings in my VS 2015 re-installation. It'd also explain why no VS 2015 Redistributables were found in my "Programs and Features"; they were listed as the 2017 ones I'm guessing.
I uninstalled VS 2015 again. Unity and VS 2017 (probably didn't have to uninstall Unity, just wanted to be safe here). I uninstalled the 2017 Redistributables. I didn't manually install the 2015 redistributables here. I just ran the VS 2015 installer and let it install them for me. Everything was successful, and the 2015 redistributables were showing again for me.
Interestingly, I got Unity installed again on my laptop too. I don't remember clicking an option for that. Maybe it's automatic for VS 2015 installs since there is VS integration in Unity.
=====
The last thing I wanted to note here is getting Visual Studio installation logs. When I originally got the redistributable warnings, I didn't save a screen shot. I wanted to look at them again. I found this microsoft site about something called the "Microsoft Visual Studio and .NET Framework Log Collection Tool", which searches for VS installation logs and other installation logs, and puts it in a .zip folder.
I ran the too, got a zip, extracted it, and used the "Agent Ransack" search program to look for keywords I remembered from the redistributable warnings. One of the files was called:
dd_patch_KB3165756_20171006121844.log
The text of interest I found was:
[1608:0BB8][2017-10-06T12:24:55]i000: MUX: Sending package issue to the caller: Type=2 Package Name=Microsoft Visual C++ 2015 Redistributable (x86) - 14.0.24215 Message=Another version of this product is already installed. Installation of this version cannot continue. To configure or remove the existing version of this product, use Add/Remove Programs on the Control Panel. Error Code=-2147023258 (0x80070666)
[1608:0BB8][2017-10-06T12:24:55]i000: MUX: Sending package issue to the caller: Type=2 Package Name=Microsoft Visual C++ 2015 Redistributable (x64) - 14.0.24215 Message=Another version of this product is already installed. Installation of this version cannot continue. To configure or remove the existing version of this product, use Add/Remove Programs on the Control Panel. Error Code=-2147023258 (0x80070666)
(I added a newline between the two messages for easier reading.)
I think I got other hits, but this is the one I saved.
Wednesday, October 11, 2017

Thursday, October 5, 2017
Developing Winapi apps from a USB flash drive
Back at university, I'd like to continue to study Windows API, but I don't want to bring my entire laptop there, with campus being a little far from my dorm and especially with computers available there. I was thinking about moving some tools over to my USB flash drive to do so.
I was thinking the most important tools were a compiler and linker. In my C:\Program Files (x86)\Microsoft Visual Studio 14.0\VC\bin, there was a cl.exe compiler that represents the VC++14.0 compiler and a link.exe for linker. I saw they were command line tools, so I was assuming there was a way to do port tools like these to a USB, but I didn't know if those were the only ones I had to move. I was wondering if there was a download somewhere that could help me out with this.
So I asked on msdn about it, and got a lot of feedback/ideas. To get straight to the main idea, user Simple Samples recommended I try Eclipse for C/C++ for ease of use, and after a lot of research, I was able to get something portable working! I'd like to share my method here. Pretty sure it's working, I'll be doing the process again on a USB 3.0 external hard drive as I write this, to double check. If there are any more nuances/mistakes I find, I'll make sure to update it here.
Here's the main tools I used at the time I wrote this:
-MinGW (g++ version says 6.3.0)
-Eclipse Neon.3 IDE for C/C++ Developers, 64-bit (not the newest IDE at this time, I've just used that version before with Python)
-JDK version 8u144 64-bit
Here's the general process:
1. Download/unzip Eclipse to a folder on the USB.
2. Download/install MinGW to a folder on the USB.
3. Download/install the JDK to a folder on the USB.
4. Setup the eclipse.ini file -vm option to point to the directory where the the Java Virtual Machine (javaw.exe) is intalled.
5. Use setlocal and set to temporarily append the MinGW and MinGW\bin paths to PATH before running eclipse.
6. Configure and run a Windows API project that uses the MinGW compiler toolchain.
Here's the process in detail:
1. Download the Eclipse Neon.3 IDE from the Eclipse website. Here's a link to the Neon.3 package listing. I chose to download using the Windows 64-bit option for my convenience. 32-bit is okay, but that means you must download either the 32-bit version of JDK (containing JRE) or just JRE by itself. Just to list it here, for the 64-bit download, I got a "eclipse-cpp-neon-3-win32-x86_64.zip".
2. When you open the zip file, you'll see a folder called "eclipse". Move/extract that folder to your root USB drive directory. At the time I'm doing this with my USB external drive, I moved it to F:\. (The directory where you place eclipse [and JDK and MinGW too] isn't important, but it's pretty convenient in my opinion to place it as the root usb directory.)
3. Download the MinGW GUI installer to install the MinGW compiler toolchain to your USB. You can go to the MinGW home page, and click the "Download Installer" button in the top right corner, which will redirect you to a SourceForge page to get the .exe. I got a "mingw-get-setup.exe" file.
4. Run the mingw .exe you got. In the license dialog, click Install. In the "Specify Installation Preferences" dialog, in the Installation Directory entry, click Change, and select a folder to install MinGW in. In my drive, I made a folder called F:\MinGW, just to be consistent with the default C:\MinGW installation path. From the MinGW Getting Started site, it's highly recommended to avoid paths w/ spaces.
5. Still in the "Specify Installation Preferences" dialog, check "... also install support for the graphical user interface.". Select the "... just for me (the current user)" radiobutton. (The Getting Started page recommends not to select the "all users" option. It was even disabled when I was doing this.) Uncheck the "... in the start menu" and "... on the desktop" options.
Overall, I think these options are for the GUI tool called "MinGW Installation Manager" (in <mingw path>\bin) you can use for easy MinGW package management (including downloading, installing, and removing packages). I use that later on. It would make sense to just have it set for the current user since this is a portable install. And it wouldn't make sense to somehow link it to all the users of one computer, when you want to use the tools in multiple different computers. I deselect the start menu/desktop shortcut options also because it wouldn't make sense to have it since you're putting tools on a USB.
Here's a screenshot below of the options:

6. Click Continue. After the download of the MinGW Installation Manager is complete, click Continue. The manager will open up.
7. Click on the checkboxes for the following and click "Mark for Installation":
-mingw-developer-toolkit
-mingw-32-base (C compiler)
-mingw-32-gcc-g++ (C++ compiler)
-msys-base
I don't actually think you need the mingw-developer-toolkit and msys-base packages since the descriptions for those in the manager say they're for MSYS, which according to the MinGW homepage is a Unix-based command-line IDE. I'm just totally guessing here, so just to be safe, I include them.

8. Click Installation -> Apply Changes. Click Apply. Downloading and installing(copying) the files will take while. When it's done with everything, it'll display a dialog like below. Click Close. You'll see in the Installation Manager green check boxes next to successfully installed packages. You can close the Manager too.

9. The next thing is to install the right Java tools to get the Eclipse GUI running. From what I know so far, you need something called the Java Runtime Environment (JRE) in order to run GUI apps based on Java, like Eclipse. Some computers already have Java installed, and if a computer's PATH is set up right (especially to the right -bit version, like 32- or 64-bit), Eclipse will run. But it's handier to have a local one installed, especially for consistency.
Having the JRE by itself is good for end-users, but I'm going to use the JDK instead, which contains developer tools in addition to an end-user copy of the JRE in a folder called "jre". (There's no special purpose when talking about this installation, it's just my choice. I don't even know Java at this time haha.)
To emphasize, you must download the bit version of JDK that matches your Eclipse bit version. 64-bit Eclipse requires 64-bit JDK, which I'll be using.
So, to install the JDK, download the installation exe from the Java site. (The one for the 8u144 version I'm using is here). In the "Java SE Development Kit 8u144" section, I accepted with license agreement and downloaded the Windows x64 version, "jdk-8u144-windows-x64.exe". (You need to accept it before downloading.)
10. Run the java install .exe. When you get to the "Choose the Java features to install" dialog, click Change, and select/make a folder on your USB to install Java in. Like the MinGW install, I chose F:\Java\jdk1.8.0_144\ just for consistency. I think having a Java folder is a good idea since JDK (and standalone JRE) installations are just copying files, like the MinGW install, and you can have different versions in different folders without worrying about registry entries and whatnot. Click Next after you've set that up.
(After the download/install, the JDK folder will be set up, with "developer binaries" in the bin folder apparently containing more tools than a standalone JRE like "javac.exe". There'll also be an end user JRE in a "jre" folder, which itself contains another "bin" binaries folder. The installation dialog is still up at this point, I just wanted to point it out. You can see for yourself with Explorer).
Now the installation dialog will ask you where you want to install a standalone JRE. Click Change, and select another, empty folder. I chose F:\Java\jre1.8.0_144. Continue/finish the install.
Looking at it now, it sounds a little confusing, having multiple JRE's available, each with the same javaw.exe Java Virtual Machine, aka JVM (not sure why it's called "javaw" though):
1. <JDK path>\bin
2. <JDK path>\jre\bin
3. <JRE path>\bin
Any of those should work when setting up eclipse to use a given JVM.
11. To setup Eclipse to run its Java GUI based on the JRE you installed, open the eclipse.ini file that's in the same directory as eclipse.exe (mine is F:\eclipse\eclipse.ini). I prefer to open it in Notepad++ instead of Notepad because at least for me, the tabs/newlines don't display correctly in Notepad. Before the -vmargs listing (before the line that says -vmargs), Add the following options as two lines:
-vm
<directory containing JRE, javaw.exe [JVM] specifically>
You can use relative or absolute directories. This is what I put:
-vm
..\Java\jdk1.8.0_144\jre\bin
-vmargs
...
My file directory is like below:
F:\
|
-Java
|
-eclipse
|
-eclipse.ini
Don't use quotations marks, even if the directory you choose has spaces in it. The .ini can already process the line as is. If you put quotation marks, the .ini will literally try to look for a path containing a quotation mark. And since that never happens, running Eclipse (eclipse.exe) won't work.
If Eclipse can't find the JRE and therefore a JVM in that JRE, it'll display an error message box about it. Here's what it looks like
 11. Before running eclipse.exe, temporarily edit your PATH variable in cmd to point to <MinGW install location> and <MinGW install location>\bin. I don't know batch scripting, but I'm familiar with cmd, so I opened it up and used these commands before running eclipse.exe.
setlocal
set PATH=%PATH%;F:\MinGW;F:\MinGW\bin
12. Run eclipse.exe from the cmd. Choose a workspace to place your projects in. I chose F:\workspace.
13. Now to setup and run a Winapi project. When the GUI comes up, click the Restore button on the top left. It's the button that looks like two cascading windows. This'll setup the Eclipse GUI so that you can see your C/C++ IDE tools.

14. Click File->New->C++ Project. Type a project name. Choose "Empty Project" for Project Type. Choose "Use default location", which will place your project folder in your workspace. Choose "MinGW GCC" as your compiler toolchain. My dialog's like below:

15. Click Finish. Click File->New->Source File. In the Source File edit box, type a name. I chose main.cpp. Click Finish.

16. (NOTE: I forgot to set up my PATH in cmd when I wrote this, and I edited in what's not Step 11. The dialog below may look different for the MINGW_HOME and MSYS_HOME variables, but the process is still the same.)
Before typing in Winapi source, set up the Project Properties. I'll start with the Environment variables. Go to Project -> Properties -> C/C++ Build -> Environment. The MINGW_HOME and MSYS_HOME are of interest. (MSYS_HOME has no effect in the overall build, but there's no harm in properly setting it, so I'll mention it here). Set the Configuration dropdown to [All Configurations] so you can edit the Debug and Release settings at the same time.
To edit the environment variables to use the right drive letter, I added my own for my convenience called USB_ROOT for convenience. To add one, click Add, type in the environment variable name you want. Type in the root. (I prefer not adding the backslash here, so that I explicitly type it in the Properties dialog later). Click OK. Here's what my dialog looks like now:

17. Edit the MINGW_HOME and MSYS_HOME path variables to use the root variable you use. Select a variable, click Edit, and change as needed. Use the dollar sign and bracket notation to do so. Here's my new dialog:

18. Next is to edit the C++ include search path so that Eclipse can correctly find/parse header files, especially windows.h. Still in the Properties dialog, go to C/C++ General -> Paths and Symbols. Select GNU C++ in the Languages section. For the Include directories section, click Add. Click File System to search for your <mingw install path>\include folder. (Mine was F:\MinGW\Include). Click ok. This is what my dialog looks like now:

When you click ok, you may see a warning about "Duplicate paths". Here's the complete info. dump when I right-clicked to Copy the warning (the first line is more about just copying section headers):
Description Resource Path Location Type
Invalid project path: Duplicate path entries found (/TestWin [Include path] isSystemInclude:true includePath:F:/MinGW/include), path: [/TestWin]. TestWin pathentry Path Entry Problem

I googled this, and saw it may be actually a bug. Here's the bug report I found. It says Rebuilding the project is a possible fix, but it still appears for me. It may be possible to fix, from what I've seen from google so far, but now, for this blog, I'll ignore it.
19. Type in your Winapi source. Here's a dropbox link to my main.cpp. All credits go to Brook Miles site "theForger's Win32 API Programming Tutorial" (my first Winapi tutorial too : ) ) .
20. Build and Run. And that's it! Here's my final result:

I think what would be important is what's below as you move to different computers, as the drive name can change:
-setting up your PATH variable
-making sure right drive is specified when choosing workspace
-updating Project -> Properties -> C/C++ Build -> Environment
-updating Project -> Properties -> Paths and Symbols, and the GNU C++ and Include Directories entries
-updating your eclipse.ini file, if you chose to make it absolute instead of relative
I feel like this can be automated with batch scripting, a Powershell script, or python if you can make it portable. I don't know batch or Powershell at this point. For Python, I'm sure it can be done. Overall, for the Project Properties, you'd have to find the right file to edit though, which I don't know at this point.
Post Notes:
-When you install MinGW with MSYS, I think you need to set up MSYS in some way to use the MinGW you installed. I haven't tried this yet. One of the blogs I researched mentioned this, if you're interested. But oveall though, you don't need to set up MSYS to use MinGW. MSYS is a set of coding tools in UNIX, completely separate from MinGW when you initially install them.
-You can set up the Project Properties before adding a source file.
-Editing the PATH variable to the right MinGW location is important. If you look in the screenshot for Step 16, you'll the default MINGW_HOME and MSYS_HOME variables point to a mingw install I did on my laptop's C drive. Without editing PATH, you may not get the MinGW GCC toolchain option when you first make a new project (if a computer doesn't have MinGW installed locally). (Check?)
-This is a YouTube tutorial that helped me to install MinGW. It's pretty funny too.
-It's good to install eclipse, MinGW, and JDK/JRE to new/empty folders. Since they don't depend on environment variables or the Registry, if you wanted to "uninstall" them, you just delete the folders. As a side note, I think that's how install/uninstall were done back then, just copy/paste files. The environment variables and the registry, combined with installation dialogs, just make it easier for the end-user. At least I'm guessing that's how it works.
-Your drive file system shouldn't matter. I initially did this on a USB flash drive with a FAT32 file system. I wrote this blog doing this on a USB 3.0 external hard drive, formatted to NTFS (I checked by right clicking on them in Explorer and clicked on Properties). They both worked.
-Having a USB w/ fast read/write is good. From a quick search, looks like they don't really give that info. You'd have to manually test it yourself with some program. SanDisk is a good brand, from my experience. USB 3.0 is of course the way to go here.
-With developing with a USB, you'll be wearing it out faster. It's good to make backups and not store critical files here permanently.
-Looks like by default, MinGW links Windows API libraries for you without you having to specify them in the compiler options (the ones that came with the mingw32-base package, according to the Installation Manager). That's pretty handy, especially if you're just starting out doing this.
-In your MinGW installation folder, in the bin folder, you'll find mingw-get.exe that's the MinGW GUI Installation Manager. I'm guessing you only get this if you choose the "install support for GUI" option during the install process
-In the overall process, I've realized that developing Winapi apps isn't exclusive to the VC++ compiler. That's pretty cool.
-Using the --version option in a mingw compiler like g++.exe or mingw32-g++.exe will give you the version number. At this time, my MinGW version was listed as "(MinGW.org GCC-6.3.0-1) 6.3.0".
-Eclipse versions are sort of confusing at first, in my opinion. What you see most directly is the version name and not number. Seems like Eclipse likes to name its versions based on outer space. What I've found was that different named Eclipse versions represent different major releases of Eclipse. Then, minor version releases are named using letters and numbers, with newer versions coming in later numbers or letters. You can see the complete listing here
-User Pavel A from that msdn post I linked mentioned CDT. I think that's more of a plugin. I got an IDE. I don't think they're the same. The CDT sounds harder to install. That's what I did, for ease-of-use purposes.
Sites:
I researched a lot of sites while doing this. I tried to keep as much as them as I could while doing the research, thought it'd be nice to share it on this blog post.
Eclipse on a USB Flashdrive
How to compile and run C++ with MinGW using Eclipse and CDT? - Stack Overflow
Installing Eclipse for C/C++ and MinGW | Another day at the office...
c++ - Configuring Eclipse for MinGW - Stack Overflow
Portable MinGW and MSYS
MinGW Site, Getting Started
MinGW Site, HOWTO Install the MinGW (GCC) Compiler Suite
omtlab - Configure your eclipse for C++
Stack Overflow - How to find out if an installed Eclipse is 32 or 64 bit version?
Stack Overflow - What is the difference between JVM, JDK, JRE & OpenJDK?
Stack Overflow - Eclipse CDT Debug not in executable format: File format not recognized after strawberry installation
Eclipse Forums - "Failure to execute MI command during Debug - Helios"
I was thinking the most important tools were a compiler and linker. In my C:\Program Files (x86)\Microsoft Visual Studio 14.0\VC\bin, there was a cl.exe compiler that represents the VC++14.0 compiler and a link.exe for linker. I saw they were command line tools, so I was assuming there was a way to do port tools like these to a USB, but I didn't know if those were the only ones I had to move. I was wondering if there was a download somewhere that could help me out with this.
So I asked on msdn about it, and got a lot of feedback/ideas. To get straight to the main idea, user Simple Samples recommended I try Eclipse for C/C++ for ease of use, and after a lot of research, I was able to get something portable working! I'd like to share my method here. Pretty sure it's working, I'll be doing the process again on a USB 3.0 external hard drive as I write this, to double check. If there are any more nuances/mistakes I find, I'll make sure to update it here.
Here's the main tools I used at the time I wrote this:
-MinGW (g++ version says 6.3.0)
-Eclipse Neon.3 IDE for C/C++ Developers, 64-bit (not the newest IDE at this time, I've just used that version before with Python)
-JDK version 8u144 64-bit
Here's the general process:
1. Download/unzip Eclipse to a folder on the USB.
2. Download/install MinGW to a folder on the USB.
3. Download/install the JDK to a folder on the USB.
4. Setup the eclipse.ini file -vm option to point to the directory where the the Java Virtual Machine (javaw.exe) is intalled.
5. Use setlocal and set to temporarily append the MinGW and MinGW\bin paths to PATH before running eclipse.
6. Configure and run a Windows API project that uses the MinGW compiler toolchain.
Here's the process in detail:
1. Download the Eclipse Neon.3 IDE from the Eclipse website. Here's a link to the Neon.3 package listing. I chose to download using the Windows 64-bit option for my convenience. 32-bit is okay, but that means you must download either the 32-bit version of JDK (containing JRE) or just JRE by itself. Just to list it here, for the 64-bit download, I got a "eclipse-cpp-neon-3-win32-x86_64.zip".
2. When you open the zip file, you'll see a folder called "eclipse". Move/extract that folder to your root USB drive directory. At the time I'm doing this with my USB external drive, I moved it to F:\. (The directory where you place eclipse [and JDK and MinGW too] isn't important, but it's pretty convenient in my opinion to place it as the root usb directory.)
3. Download the MinGW GUI installer to install the MinGW compiler toolchain to your USB. You can go to the MinGW home page, and click the "Download Installer" button in the top right corner, which will redirect you to a SourceForge page to get the .exe. I got a "mingw-get-setup.exe" file.
4. Run the mingw .exe you got. In the license dialog, click Install. In the "Specify Installation Preferences" dialog, in the Installation Directory entry, click Change, and select a folder to install MinGW in. In my drive, I made a folder called F:\MinGW, just to be consistent with the default C:\MinGW installation path. From the MinGW Getting Started site, it's highly recommended to avoid paths w/ spaces.
5. Still in the "Specify Installation Preferences" dialog, check "... also install support for the graphical user interface.". Select the "... just for me (the current user)" radiobutton. (The Getting Started page recommends not to select the "all users" option. It was even disabled when I was doing this.) Uncheck the "... in the start menu" and "... on the desktop" options.
Overall, I think these options are for the GUI tool called "MinGW Installation Manager" (in <mingw path>\bin) you can use for easy MinGW package management (including downloading, installing, and removing packages). I use that later on. It would make sense to just have it set for the current user since this is a portable install. And it wouldn't make sense to somehow link it to all the users of one computer, when you want to use the tools in multiple different computers. I deselect the start menu/desktop shortcut options also because it wouldn't make sense to have it since you're putting tools on a USB.
Here's a screenshot below of the options:

6. Click Continue. After the download of the MinGW Installation Manager is complete, click Continue. The manager will open up.
7. Click on the checkboxes for the following and click "Mark for Installation":
-mingw-developer-toolkit
-mingw-32-base (C compiler)
-mingw-32-gcc-g++ (C++ compiler)
-msys-base
I don't actually think you need the mingw-developer-toolkit and msys-base packages since the descriptions for those in the manager say they're for MSYS, which according to the MinGW homepage is a Unix-based command-line IDE. I'm just totally guessing here, so just to be safe, I include them.

8. Click Installation -> Apply Changes. Click Apply. Downloading and installing(copying) the files will take while. When it's done with everything, it'll display a dialog like below. Click Close. You'll see in the Installation Manager green check boxes next to successfully installed packages. You can close the Manager too.

9. The next thing is to install the right Java tools to get the Eclipse GUI running. From what I know so far, you need something called the Java Runtime Environment (JRE) in order to run GUI apps based on Java, like Eclipse. Some computers already have Java installed, and if a computer's PATH is set up right (especially to the right -bit version, like 32- or 64-bit), Eclipse will run. But it's handier to have a local one installed, especially for consistency.
Having the JRE by itself is good for end-users, but I'm going to use the JDK instead, which contains developer tools in addition to an end-user copy of the JRE in a folder called "jre". (There's no special purpose when talking about this installation, it's just my choice. I don't even know Java at this time haha.)
To emphasize, you must download the bit version of JDK that matches your Eclipse bit version. 64-bit Eclipse requires 64-bit JDK, which I'll be using.
So, to install the JDK, download the installation exe from the Java site. (The one for the 8u144 version I'm using is here). In the "Java SE Development Kit 8u144" section, I accepted with license agreement and downloaded the Windows x64 version, "jdk-8u144-windows-x64.exe". (You need to accept it before downloading.)
10. Run the java install .exe. When you get to the "Choose the Java features to install" dialog, click Change, and select/make a folder on your USB to install Java in. Like the MinGW install, I chose F:\Java\jdk1.8.0_144\ just for consistency. I think having a Java folder is a good idea since JDK (and standalone JRE) installations are just copying files, like the MinGW install, and you can have different versions in different folders without worrying about registry entries and whatnot. Click Next after you've set that up.
(After the download/install, the JDK folder will be set up, with "developer binaries" in the bin folder apparently containing more tools than a standalone JRE like "javac.exe". There'll also be an end user JRE in a "jre" folder, which itself contains another "bin" binaries folder. The installation dialog is still up at this point, I just wanted to point it out. You can see for yourself with Explorer).
Now the installation dialog will ask you where you want to install a standalone JRE. Click Change, and select another, empty folder. I chose F:\Java\jre1.8.0_144. Continue/finish the install.
Looking at it now, it sounds a little confusing, having multiple JRE's available, each with the same javaw.exe Java Virtual Machine, aka JVM (not sure why it's called "javaw" though):
1. <JDK path>\bin
2. <JDK path>\jre\bin
3. <JRE path>\bin
Any of those should work when setting up eclipse to use a given JVM.
11. To setup Eclipse to run its Java GUI based on the JRE you installed, open the eclipse.ini file that's in the same directory as eclipse.exe (mine is F:\eclipse\eclipse.ini). I prefer to open it in Notepad++ instead of Notepad because at least for me, the tabs/newlines don't display correctly in Notepad. Before the -vmargs listing (before the line that says -vmargs), Add the following options as two lines:
-vm
<directory containing JRE, javaw.exe [JVM] specifically>
You can use relative or absolute directories. This is what I put:
-vm
..\Java\jdk1.8.0_144\jre\bin
-vmargs
...
My file directory is like below:
F:\
|
-Java
|
-eclipse
|
-eclipse.ini
Don't use quotations marks, even if the directory you choose has spaces in it. The .ini can already process the line as is. If you put quotation marks, the .ini will literally try to look for a path containing a quotation mark. And since that never happens, running Eclipse (eclipse.exe) won't work.
If Eclipse can't find the JRE and therefore a JVM in that JRE, it'll display an error message box about it. Here's what it looks like

setlocal
set PATH=%PATH%;F:\MinGW;F:\MinGW\bin
12. Run eclipse.exe from the cmd. Choose a workspace to place your projects in. I chose F:\workspace.
13. Now to setup and run a Winapi project. When the GUI comes up, click the Restore button on the top left. It's the button that looks like two cascading windows. This'll setup the Eclipse GUI so that you can see your C/C++ IDE tools.

14. Click File->New->C++ Project. Type a project name. Choose "Empty Project" for Project Type. Choose "Use default location", which will place your project folder in your workspace. Choose "MinGW GCC" as your compiler toolchain. My dialog's like below:

15. Click Finish. Click File->New->Source File. In the Source File edit box, type a name. I chose main.cpp. Click Finish.

16. (NOTE: I forgot to set up my PATH in cmd when I wrote this, and I edited in what's not Step 11. The dialog below may look different for the MINGW_HOME and MSYS_HOME variables, but the process is still the same.)
Before typing in Winapi source, set up the Project Properties. I'll start with the Environment variables. Go to Project -> Properties -> C/C++ Build -> Environment. The MINGW_HOME and MSYS_HOME are of interest. (MSYS_HOME has no effect in the overall build, but there's no harm in properly setting it, so I'll mention it here). Set the Configuration dropdown to [All Configurations] so you can edit the Debug and Release settings at the same time.
To edit the environment variables to use the right drive letter, I added my own for my convenience called USB_ROOT for convenience. To add one, click Add, type in the environment variable name you want. Type in the root. (I prefer not adding the backslash here, so that I explicitly type it in the Properties dialog later). Click OK. Here's what my dialog looks like now:

17. Edit the MINGW_HOME and MSYS_HOME path variables to use the root variable you use. Select a variable, click Edit, and change as needed. Use the dollar sign and bracket notation to do so. Here's my new dialog:

18. Next is to edit the C++ include search path so that Eclipse can correctly find/parse header files, especially windows.h. Still in the Properties dialog, go to C/C++ General -> Paths and Symbols. Select GNU C++ in the Languages section. For the Include directories section, click Add. Click File System to search for your <mingw install path>\include folder. (Mine was F:\MinGW\Include). Click ok. This is what my dialog looks like now:

When you click ok, you may see a warning about "Duplicate paths". Here's the complete info. dump when I right-clicked to Copy the warning (the first line is more about just copying section headers):
Description Resource Path Location Type
Invalid project path: Duplicate path entries found (/TestWin [Include path] isSystemInclude:true includePath:F:/MinGW/include), path: [/TestWin]. TestWin pathentry Path Entry Problem

I googled this, and saw it may be actually a bug. Here's the bug report I found. It says Rebuilding the project is a possible fix, but it still appears for me. It may be possible to fix, from what I've seen from google so far, but now, for this blog, I'll ignore it.
19. Type in your Winapi source. Here's a dropbox link to my main.cpp. All credits go to Brook Miles site "theForger's Win32 API Programming Tutorial" (my first Winapi tutorial too : ) ) .
20. Build and Run. And that's it! Here's my final result:

I think what would be important is what's below as you move to different computers, as the drive name can change:
-setting up your PATH variable
-making sure right drive is specified when choosing workspace
-updating Project -> Properties -> C/C++ Build -> Environment
-updating Project -> Properties -> Paths and Symbols, and the GNU C++ and Include Directories entries
-updating your eclipse.ini file, if you chose to make it absolute instead of relative
I feel like this can be automated with batch scripting, a Powershell script, or python if you can make it portable. I don't know batch or Powershell at this point. For Python, I'm sure it can be done. Overall, for the Project Properties, you'd have to find the right file to edit though, which I don't know at this point.
Post Notes:
-When you install MinGW with MSYS, I think you need to set up MSYS in some way to use the MinGW you installed. I haven't tried this yet. One of the blogs I researched mentioned this, if you're interested. But oveall though, you don't need to set up MSYS to use MinGW. MSYS is a set of coding tools in UNIX, completely separate from MinGW when you initially install them.
-You can set up the Project Properties before adding a source file.
-Editing the PATH variable to the right MinGW location is important. If you look in the screenshot for Step 16, you'll the default MINGW_HOME and MSYS_HOME variables point to a mingw install I did on my laptop's C drive. Without editing PATH, you may not get the MinGW GCC toolchain option when you first make a new project (if a computer doesn't have MinGW installed locally). (Check?)
-This is a YouTube tutorial that helped me to install MinGW. It's pretty funny too.
-It's good to install eclipse, MinGW, and JDK/JRE to new/empty folders. Since they don't depend on environment variables or the Registry, if you wanted to "uninstall" them, you just delete the folders. As a side note, I think that's how install/uninstall were done back then, just copy/paste files. The environment variables and the registry, combined with installation dialogs, just make it easier for the end-user. At least I'm guessing that's how it works.
-Your drive file system shouldn't matter. I initially did this on a USB flash drive with a FAT32 file system. I wrote this blog doing this on a USB 3.0 external hard drive, formatted to NTFS (I checked by right clicking on them in Explorer and clicked on Properties). They both worked.
-Having a USB w/ fast read/write is good. From a quick search, looks like they don't really give that info. You'd have to manually test it yourself with some program. SanDisk is a good brand, from my experience. USB 3.0 is of course the way to go here.
-With developing with a USB, you'll be wearing it out faster. It's good to make backups and not store critical files here permanently.
-Looks like by default, MinGW links Windows API libraries for you without you having to specify them in the compiler options (the ones that came with the mingw32-base package, according to the Installation Manager). That's pretty handy, especially if you're just starting out doing this.
-In your MinGW installation folder, in the bin folder, you'll find mingw-get.exe that's the MinGW GUI Installation Manager. I'm guessing you only get this if you choose the "install support for GUI" option during the install process
-In the overall process, I've realized that developing Winapi apps isn't exclusive to the VC++ compiler. That's pretty cool.
-Using the --version option in a mingw compiler like g++.exe or mingw32-g++.exe will give you the version number. At this time, my MinGW version was listed as "(MinGW.org GCC-6.3.0-1) 6.3.0".
-Eclipse versions are sort of confusing at first, in my opinion. What you see most directly is the version name and not number. Seems like Eclipse likes to name its versions based on outer space. What I've found was that different named Eclipse versions represent different major releases of Eclipse. Then, minor version releases are named using letters and numbers, with newer versions coming in later numbers or letters. You can see the complete listing here
-User Pavel A from that msdn post I linked mentioned CDT. I think that's more of a plugin. I got an IDE. I don't think they're the same. The CDT sounds harder to install. That's what I did, for ease-of-use purposes.
Sites:
I researched a lot of sites while doing this. I tried to keep as much as them as I could while doing the research, thought it'd be nice to share it on this blog post.
Eclipse on a USB Flashdrive
How to compile and run C++ with MinGW using Eclipse and CDT? - Stack Overflow
Installing Eclipse for C/C++ and MinGW | Another day at the office...
c++ - Configuring Eclipse for MinGW - Stack Overflow
Portable MinGW and MSYS
MinGW Site, Getting Started
MinGW Site, HOWTO Install the MinGW (GCC) Compiler Suite
omtlab - Configure your eclipse for C++
Stack Overflow - How to find out if an installed Eclipse is 32 or 64 bit version?
Stack Overflow - What is the difference between JVM, JDK, JRE & OpenJDK?
About the possible Eclipse bug with Include settings:
Eclispe forums - Problems with path discovery
Eclipse forums - How to delete single paths
Eclipse bug reporting - Include path discovery doesn't discard obsolete paths on compiler upgrade
Some sites I ended up putting on my txt list don't seem relevant to this post now that I look at it, but I still thought it'd be nice to share them:Eclispe forums - Problems with path discovery
Eclipse forums - How to delete single paths
Eclipse bug reporting - Include path discovery doesn't discard obsolete paths on compiler upgrade
Stack Overflow - Eclipse CDT Debug not in executable format: File format not recognized after strawberry installation
Eclipse Forums - "Failure to execute MI command during Debug - Helios"
Tuesday, August 29, 2017
Building pbrt-v3 in VS 2015, other notes
I thought I'd write other things I found interesting while writing in my blog about how I built pbrt-v3. Again, I hardly know anything about pbrt itself or Cmake, but I still I thought it'd be cool to share what I found about them (and the whole process in general, too).
-Two major things I put here:
-Debug vs. Release build of pbrt
-Possible minor bug fix with PBRT_FLOAT_AS_DOUBLE
-The pbrt authors included a Users' Guide in their site. They also provide info. about their Input File Format (probably about the .pbrt files like "teapot-metal.pbrt".
-Biggest thing to note: from the pbrt site, pbrt in "Debug mode" is understandably very slow compared to "Release mode". For "Release mode" and the faster render times, during CMake usage, the option CMAKE_BUILD_TYPE is automatically set to "Release".
But you can still build the VS solution in Debug mode, and the corresponding pbrt.exe outputs the banner *** DEBUG BUILD *** when you run it, to notify you of slow rendering times for debugging purposes. So make sure to also build the solution in Release mode if you just want to render.
Again, the differences are massive. I only found this out today, as I'm writing this! haha. I didn't really read the banner, I was just focused on getting something to work when I first did this.
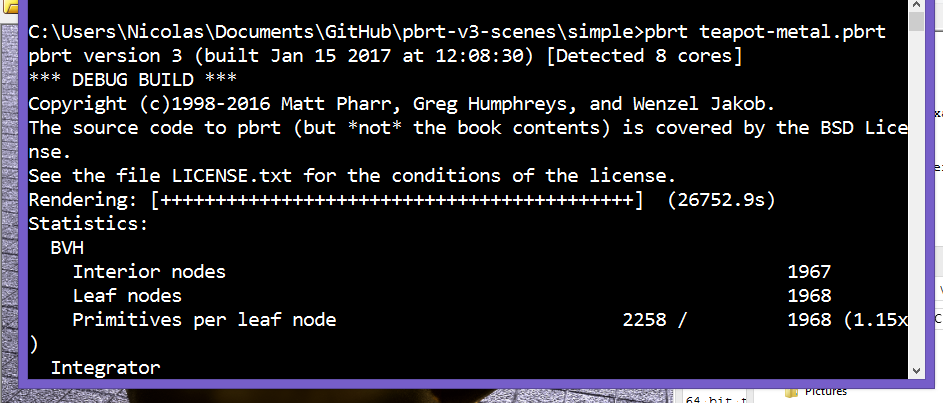
Here's two images showing how different the rendering times are:
Debug build (also my first successful pbrt render back in January!): 26572.9s = 7.4 hrs

Release build: 880.5s = 14.675 min (30x faster!)

-Possible minor bug fix:
EDIT: got a confirmation from one of the pbrt authors! : ) was a bug. better solution than pointer casting is to actually create a local Float[] array where you can pass in float elements that can be implicitly converted to double elements, see highlighted edit below
(Basically, found if you #define PBRT_FLOAT_AS_DOUBLE, get an error in ptex.cpp, line 130 in VS 2015 saying can't convert a "float*" to "const pbrt::Float[]", which now is "const double[]", explicitly casting the result variable in that line to "const pbrt::Float*" worked for me)
The pbrt site says you can uncomment the //#define PBRT_FLOAT_AS_DOUBLE line in the src/core/pbrt.h file that's in the pbrt repo you can check out. You can do this even if you already have a pbrt VS solution made, since it's just a .h file you're editing.
When I built on Release - x64, however, I got these errors:
C2664 'pbrt::RGBSpectrum pbrt::RGBSpectrum::FromRGB(const pbrt::Float [],pbrt::SpectrumType)': cannot convert argument 1 from 'float *' to 'const pbrt::Float[]'
argument of type "float *" is incompatible with parameter of type "const pbrt::Float"

This is in a file called ptex.cpp, in line 130, in the pbrt project. From looking at the project properties, the pbrt project is supposed to make some "libpbrt.lib" library. With this error, the .lib file isn't made, which caused errors about not being able to open that .lib file.

The function definition containing line 130 is:
template <>
inline Spectrum fromResult<Spectrum>(int nc, float *result) {
if (nc == 1)
return Spectrum(result[0]);
else
return Spectrum::FromRGB(result);
}
Wasn't familiar with the "template <>" or "inline" keywords at the time, but saw with VS that Spectrum::FromRGB takes a "const pbrt::Float *" as its first argument. Looking back at the pbrt.h file, turning on PBRT_FLOAT_AS_DOUBLE changes the Float typedef from a float to a double (also, the pbrt.h defines this in a pbrt namespace [hence pbrt::Float]):
#define PBRT_FLOAT_AS_DOUBLE
#ifdef PBRT_FLOAT_AS_DOUBLE
typedef double Float;
#else
typedef float Float;
#endif // PBRT_FLOAT_AS_DOUBLE
So going back to that code snippet, since "const pbrt::Float*" pretty much meants "const double *", passing "result" tries to implicitly convert a float* to a double*, and apparently that's an error in VS 2015 (not sure if that's universal).
So I put an explicit cast like below, built the solution again, and it worked.
return Spectrum::FromRGB((const pbrt::Float*)result);
I wrote about the bug fix I did in the Github issue tracker for the pbrt repo. It's minor compared to the entire scope of pbrt itself, but I thought it could help. Interestingly, I looked back at the pbrt solution I made back in January, and didn't find a ptex.cpp file there. Looks like this is relatively new. May be related to some texture cache feature they implemented back in March, according to their site news.
Edit Got a confirmation that this line was a bug. One of the pbrt authors pushed a fix today
template <>
inline Spectrum fromResult<Spectrum>(int nc, float *result) {
if (nc == 1)
return Spectrum(result[0]);
else {
Float rgb[3] = { result[0], result[1], result[2] };
return Spectrum::FromRGB(rgb);
}
}
This is a better solution, to actually pass a pbrt::Float[] into Spectrum::FromRGB by creating a local Float array variable called "rgb". (I assume the size is 3 just because "rgb" is 3 values.) Looks like since it's assured that the array pointed to by "result" is size 3, can initialize the "rgb" by passing in float values pointed to by the "result" array. The values are then implicitly converted to double values since Float is of type double due to the PBRT_FLOAT_AS_DOUBLE define, and then the array is good to go to be passed into the "FromRGB" function.
Cleaner and makes more sense than converting a float* to a double*, but still, happy I got some sort of bug fix working. Pretty cool, this would be the first bug I ever found in source code as big as this. Minor bug, but still, big self-achievement for me! : )
-The pbrt site says it supports pfm, exr, tga, png file formats (where pfm and exr are more "accurate" file formats because they can store floats for what I think are color values). In the "teapot-metal.pbrt" file, in line 9 (doing this from Notepad++), you can change "teapot-metal.exr" to "teapot-metal.png" if you just want to see the image in a program like IrfanView immediately.

The pbrt-v3-scenes folder contains already made .exr files at pbrt-v3-scenes/images. A teapot-metal.exr is available in the "simple" folder.
-If you try to "Download ZIP" at the pbrt repo site or try to do clone the repo w/o the --recursive flag, you'll get an error in CMake GUI about the flag.

-When running "pbrt teapot-metal.pbrt" in cmd, teapot-metal.pbrt references other files. If it doesn't find them, it shows a warning, like below. The .pbrt file uses custom-made text inputs, from what I'm seeing. They include references to other files.

-Two major things I put here:
-Debug vs. Release build of pbrt
-Possible minor bug fix with PBRT_FLOAT_AS_DOUBLE
-The pbrt authors included a Users' Guide in their site. They also provide info. about their Input File Format (probably about the .pbrt files like "teapot-metal.pbrt".
-Biggest thing to note: from the pbrt site, pbrt in "Debug mode" is understandably very slow compared to "Release mode". For "Release mode" and the faster render times, during CMake usage, the option CMAKE_BUILD_TYPE is automatically set to "Release".
But you can still build the VS solution in Debug mode, and the corresponding pbrt.exe outputs the banner *** DEBUG BUILD *** when you run it, to notify you of slow rendering times for debugging purposes. So make sure to also build the solution in Release mode if you just want to render.
Again, the differences are massive. I only found this out today, as I'm writing this! haha. I didn't really read the banner, I was just focused on getting something to work when I first did this.
Here's two images showing how different the rendering times are:
Debug build (also my first successful pbrt render back in January!): 26572.9s = 7.4 hrs
Release build: 880.5s = 14.675 min (30x faster!)

-Possible minor bug fix:
EDIT: got a confirmation from one of the pbrt authors! : ) was a bug. better solution than pointer casting is to actually create a local Float[] array where you can pass in float elements that can be implicitly converted to double elements, see highlighted edit below
(Basically, found if you #define PBRT_FLOAT_AS_DOUBLE, get an error in ptex.cpp, line 130 in VS 2015 saying can't convert a "float*" to "const pbrt::Float[]", which now is "const double[]", explicitly casting the result variable in that line to "const pbrt::Float*" worked for me)
The pbrt site says you can uncomment the //#define PBRT_FLOAT_AS_DOUBLE line in the src/core/pbrt.h file that's in the pbrt repo you can check out. You can do this even if you already have a pbrt VS solution made, since it's just a .h file you're editing.
When I built on Release - x64, however, I got these errors:
C2664 'pbrt::RGBSpectrum pbrt::RGBSpectrum::FromRGB(const pbrt::Float [],pbrt::SpectrumType)': cannot convert argument 1 from 'float *' to 'const pbrt::Float[]'
argument of type "float *" is incompatible with parameter of type "const pbrt::Float"

This is in a file called ptex.cpp, in line 130, in the pbrt project. From looking at the project properties, the pbrt project is supposed to make some "libpbrt.lib" library. With this error, the .lib file isn't made, which caused errors about not being able to open that .lib file.

The function definition containing line 130 is:
template <>
inline Spectrum fromResult<Spectrum>(int nc, float *result) {
if (nc == 1)
return Spectrum(result[0]);
else
return Spectrum::FromRGB(result);
}
Wasn't familiar with the "template <>" or "inline" keywords at the time, but saw with VS that Spectrum::FromRGB takes a "const pbrt::Float *" as its first argument. Looking back at the pbrt.h file, turning on PBRT_FLOAT_AS_DOUBLE changes the Float typedef from a float to a double (also, the pbrt.h defines this in a pbrt namespace [hence pbrt::Float]):
#define PBRT_FLOAT_AS_DOUBLE
#ifdef PBRT_FLOAT_AS_DOUBLE
typedef double Float;
#else
typedef float Float;
#endif // PBRT_FLOAT_AS_DOUBLE
So going back to that code snippet, since "const pbrt::Float*" pretty much meants "const double *", passing "result" tries to implicitly convert a float* to a double*, and apparently that's an error in VS 2015 (not sure if that's universal).
So I put an explicit cast like below, built the solution again, and it worked.
return Spectrum::FromRGB((const pbrt::Float*)result);
I wrote about the bug fix I did in the Github issue tracker for the pbrt repo. It's minor compared to the entire scope of pbrt itself, but I thought it could help. Interestingly, I looked back at the pbrt solution I made back in January, and didn't find a ptex.cpp file there. Looks like this is relatively new. May be related to some texture cache feature they implemented back in March, according to their site news.
Edit Got a confirmation that this line was a bug. One of the pbrt authors pushed a fix today
template <>
inline Spectrum fromResult<Spectrum>(int nc, float *result) {
if (nc == 1)
return Spectrum(result[0]);
else {
Float rgb[3] = { result[0], result[1], result[2] };
return Spectrum::FromRGB(rgb);
}
}
This is a better solution, to actually pass a pbrt::Float[] into Spectrum::FromRGB by creating a local Float array variable called "rgb". (I assume the size is 3 just because "rgb" is 3 values.) Looks like since it's assured that the array pointed to by "result" is size 3, can initialize the "rgb" by passing in float values pointed to by the "result" array. The values are then implicitly converted to double values since Float is of type double due to the PBRT_FLOAT_AS_DOUBLE define, and then the array is good to go to be passed into the "FromRGB" function.
Cleaner and makes more sense than converting a float* to a double*, but still, happy I got some sort of bug fix working. Pretty cool, this would be the first bug I ever found in source code as big as this. Minor bug, but still, big self-achievement for me! : )
-The pbrt site says it supports pfm, exr, tga, png file formats (where pfm and exr are more "accurate" file formats because they can store floats for what I think are color values). In the "teapot-metal.pbrt" file, in line 9 (doing this from Notepad++), you can change "teapot-metal.exr" to "teapot-metal.png" if you just want to see the image in a program like IrfanView immediately.

The pbrt-v3-scenes folder contains already made .exr files at pbrt-v3-scenes/images. A teapot-metal.exr is available in the "simple" folder.
-If you try to "Download ZIP" at the pbrt repo site or try to do clone the repo w/o the --recursive flag, you'll get an error in CMake GUI about the flag.

-When running "pbrt teapot-metal.pbrt" in cmd, teapot-metal.pbrt references other files. If it doesn't find them, it shows a warning, like below. The .pbrt file uses custom-made text inputs, from what I'm seeing. They include references to other files.

Building pbrt-v3 in VS 2015, rendering a metal teapot
Finding Physically Based Rendering: From Theory to Implementation at my university last August and then figuring out this January how to build pbrt-v3 and use cmake for the first time was really exciting for me. Hardly knew anything about them then (and now too haha), but would like to look more into raytracing with this in the future.
For now, I'd like to share the bare steps I took to get pbrt-v3 built in VS 2015 in 64-bit and to render a "teapot-metal.pbrt" sample. Again, I know close to nothing about pbrt and little about cmake, but I still think it'd be cool to share the steps I found to get something rendered here, for people interested in computer graphics at this level.
EDIT: Important to note is that Debug build of pbrt for debugging purposes runs way slower than Release build. Also, possible minor bug fix with PBRT_FLOAT_AS_DOUBLE. Made general other notes about pbrt in a blog post here
(Using Windows 8.1, Visual Studio 2015, and CMake 3.7.2. For git, I just got it working by installing Github Desktop for Windows)
1. Open cmd. Switch to a folder where you want the pbrt-v3 source code folder to be cloned into.
2. Type "git clone --recursive https://github.com/mmp/pbrt-v3/.
-Cloning will take a while. A folder named "pbrt-v3" will appear when done.
3. Open CMake GUI.
-For "Where is the source code", click "Browse Source", and select the "pbrt-v3" folder.
-For "Where to build the binaries", select an empty folder. I made a folder called "pbrt_build".
4. Click "Configure". In "Specify the generator for this project", Select "Visual Studio 14 2015 Win64" (this will make a VS 2015 solution that only has a 64-bit build option). Click Finish.
5. CMake will do configuration processing. When it's finished, it'll show values in red. Click "Configure" again to confirm the configuration.
6. Click "Generate" to actually create a VS 2015 solution. Then click "Open Project" to open the solution.
7. VS 2015 will probably do some initial processing. When it's done, click "Build -> Build Solution".
-The configuration I'm building in is Debug - x64.
8. With a successful build, you'll get a "pbrt.exe" to use. I'd say check it out at this point, for curiosity.
-To check out the build, open your solution directory (you can right-click "Solution 'PBRT-V3' (40 projects)" in the Solution Explorer and click "Open Folder in File Explorer").
-Open the Debug folder from there. There'll be a bunch of exes, "pbrt.exe" included. Open cmd in the Debug folder (you can Shift -> Right-click -> Open command window here, for convenience).
-Type "pbrt". You'll see version information. Hit "Ctrl+C" at the prompt to exit the program.

9. Knowing about pbrt.exe, you can render a sample. I'll be focusing on a file set based on a teapot-metal.pbrt. To check out the entire sample set linked in the pbrt site, follow steps 10 and 11. The sample set is massive, 10 GB, so I provided the files for the teapot in my dropbox in step 12 if you just want that.
10. To check out the entire 10 GB sample set linked in the pbrt site, in cmd, switch to a folder where you want to clone a "pbrt-v3-scenes" folder into.
11. Type "git clone git://git.pbrt.org/pbrt-v3-scenes".
-The scenes folder is super massive, 10 GB. Cloning seems to compress the folder to ~3.11 GB from looking at cmd, but still very large.

12. If you want to just get the files for rendering the sample teapot I'll be using, here's a link in my dropbox. Download all the files somewhere. Make sure to preserve the directory structure. The files referenced in teapot-metal.pbrt are relative.
13. Run cmd. Type "pbrt <directory>\teapot-metal.pbrt". For my computer, I downloaded the entire 10 GB sample set, and I typed:
pbrt "C:\Users\Nicolas\Desktop\pbrt_test\pbrt-v3-scenes\simple\teapot-metal.pbrt"
-You should see licensing info. immediately, and a progress bar appear after a while (probably due to some pre-procsessing stuff).
14. Wait a long time. Keep your computer on.
-When I did my first pbrt render with this teapot, the stats showed 26752.9 seconds. (That's 7.4 hours!)
15. On completion, you'll see a teapot-metal.exr file in the same directory as where you ran the pbrt command. Open/convert as needed. For me, I had to convert it to some file I could open. Currently, I find you can use Convertio to convert an exr to a jpg for example. It's free, no hassle.
16. That's it! Here's the jpg I got while writing this:

For now, I'd like to share the bare steps I took to get pbrt-v3 built in VS 2015 in 64-bit and to render a "teapot-metal.pbrt" sample. Again, I know close to nothing about pbrt and little about cmake, but I still think it'd be cool to share the steps I found to get something rendered here, for people interested in computer graphics at this level.
EDIT: Important to note is that Debug build of pbrt for debugging purposes runs way slower than Release build. Also, possible minor bug fix with PBRT_FLOAT_AS_DOUBLE. Made general other notes about pbrt in a blog post here
(Using Windows 8.1, Visual Studio 2015, and CMake 3.7.2. For git, I just got it working by installing Github Desktop for Windows)
1. Open cmd. Switch to a folder where you want the pbrt-v3 source code folder to be cloned into.
2. Type "git clone --recursive https://github.com/mmp/pbrt-v3/.
-Cloning will take a while. A folder named "pbrt-v3" will appear when done.
3. Open CMake GUI.
-For "Where is the source code", click "Browse Source", and select the "pbrt-v3" folder.
-For "Where to build the binaries", select an empty folder. I made a folder called "pbrt_build".
4. Click "Configure". In "Specify the generator for this project", Select "Visual Studio 14 2015 Win64" (this will make a VS 2015 solution that only has a 64-bit build option). Click Finish.
5. CMake will do configuration processing. When it's finished, it'll show values in red. Click "Configure" again to confirm the configuration.
6. Click "Generate" to actually create a VS 2015 solution. Then click "Open Project" to open the solution.
7. VS 2015 will probably do some initial processing. When it's done, click "Build -> Build Solution".
-The configuration I'm building in is Debug - x64.
8. With a successful build, you'll get a "pbrt.exe" to use. I'd say check it out at this point, for curiosity.
-To check out the build, open your solution directory (you can right-click "Solution 'PBRT-V3' (40 projects)" in the Solution Explorer and click "Open Folder in File Explorer").
-Open the Debug folder from there. There'll be a bunch of exes, "pbrt.exe" included. Open cmd in the Debug folder (you can Shift -> Right-click -> Open command window here, for convenience).
-Type "pbrt". You'll see version information. Hit "Ctrl+C" at the prompt to exit the program.

9. Knowing about pbrt.exe, you can render a sample. I'll be focusing on a file set based on a teapot-metal.pbrt. To check out the entire sample set linked in the pbrt site, follow steps 10 and 11. The sample set is massive, 10 GB, so I provided the files for the teapot in my dropbox in step 12 if you just want that.
10. To check out the entire 10 GB sample set linked in the pbrt site, in cmd, switch to a folder where you want to clone a "pbrt-v3-scenes" folder into.
11. Type "git clone git://git.pbrt.org/pbrt-v3-scenes".
-The scenes folder is super massive, 10 GB. Cloning seems to compress the folder to ~3.11 GB from looking at cmd, but still very large.

12. If you want to just get the files for rendering the sample teapot I'll be using, here's a link in my dropbox. Download all the files somewhere. Make sure to preserve the directory structure. The files referenced in teapot-metal.pbrt are relative.
13. Run cmd. Type "pbrt <directory>\teapot-metal.pbrt". For my computer, I downloaded the entire 10 GB sample set, and I typed:
pbrt "C:\Users\Nicolas\Desktop\pbrt_test\pbrt-v3-scenes\simple\teapot-metal.pbrt"
-You should see licensing info. immediately, and a progress bar appear after a while (probably due to some pre-procsessing stuff).
14. Wait a long time. Keep your computer on.
-When I did my first pbrt render with this teapot, the stats showed 26752.9 seconds. (That's 7.4 hours!)
15. On completion, you'll see a teapot-metal.exr file in the same directory as where you ran the pbrt command. Open/convert as needed. For me, I had to convert it to some file I could open. Currently, I find you can use Convertio to convert an exr to a jpg for example. It's free, no hassle.
16. That's it! Here's the jpg I got while writing this:

Saturday, August 12, 2017
Information Overload Thoughts
I had a sticky note about something along the lines of "blog about society changing with the information overload shift". I think it said that, I just deleted it on Sticky Notes a few seconds ago, and unfortunately there's no Undo.
I had that for a while now after last university quarter as a freshman. I'd just finished a linear algebra class, my last writing class, and an intermediate python programming class. And to really emphasize it, that was my last official general writing class. Looking at the course catalog, I think I'm required to take an "upper division computer science writing class", but other than that, that was in a sense my last writing class I'd ever have to take in life.
Anyways, I'm being vague about the class details, sorry, but I want to focus on my thoughts on the end of the quarter. My last writing class's focus was on "Argument & Research". Apparently, at the end of the quarter and my first freshman year, I was having thoughts about being information overloaded. Like, I was thinking to myself, "Isn't taking ~3 to 4 classes per 10 week quarter to graduate a tiny bit too much?" It's a lot of information to digest and think about, in my opinion. Though I did well in all my classes last quarter, I'd often think to myself that 3 to 4 classes in that time span is a little bit much to ask.
And I'd have thoughts about what if the university requirement was lowered so that you could pace yourself to around 2 to 3 classes per quarter to graduate. Put less stress on yourself, dedicate more time to the content of classes, allow students to pursue their own interests. I think that the more you encourage people to pursue their own interests, the more it'll benefit them in the long run, and I think that'll make for a better education (and better life accomplishments in general).
Looking back at it more, I'd say even middle school and high school were more content packed, at least from my experience. I remember doing a lot of worksheets and projects, like --a lot-- of them, really. I mean, the subjects were interesting. Going off the top of my head, I took classes about life science, algebra 1 and algebra 2. Band elective in middle school. Art in high school. Spanish 1-2 and Spanish 3-4 in high school. They were interesting, but keeping up with them was really hard. That was like, 6 - 8 subjects per week, looking back at a high school calendar pdf I scanned. Like 3 classes on a Monday, the other 3 on a Tuesday, and with homework. (And also, summer reading! I just wanted to take a break, but in middle school and high school, had to read a book and do a report over the summer. Just wanted a full break then though!)
So alright, now that I think about it, I do see my university schedule as more flexible than my middle school and high school one. Like, a lot. I guess I also feel more flexible since I dorm around the campus. So yes, I am thankful for the change of pace from high school to university. But nonetheless, I'd argue that multitasking with at least 3 to 4 classes is a little bit over the top, regardless of type of schooling, if someone wanted to seriously study all those subjects.
However, I do realize that dropping the amount of classes can have a lot of cons too. People could feel less motivated. And at least in the university, professors and staff may have thought a long time on how courses should be structured or the content they want to present to a student taking a certain major, like Biology or Computer Science. So they can be justified in course rigor. Also, having various classes would help someone gain breadth, knowledge-wise. Like, gaining familiarity with both art and math could be pretty beneficial if someone wanted to be well-rounded.
Anyways, it's hard to remember my feelings about how school was back in middle school, high school, and last freshman year. I just remember feeling a little bit troubled by how much info. I'd have to process with multiple classes. I did genuinely think about course content, (and especially with comp. sci. now!). In middle school and high school, I may have try-harded a lot on my assignments, I can admit that. I did have a few extracurricular activities in middle school and high school. And I may have procrastinated a lot too (but not always!). So all-in-all, it's hard to say right now whether the bigger problem is how much school work is presented, or how much I want to spend on it. Maybe it's equally both. If I were to write more about this, it'd have to be while I'm back in the full university quarter next month.
Nonetheless, what I really feel for sure is that, being at the university I'm at right now, I get more free time to pursue my computer graphics interests, and I'm extremely happy to do that. As long as I get to devote most of my time to that, I'll be happy with any workload.
------
Alright, I ended up writing a lot about my thoughts of school and workload, guess wanted to put my thoughts fully there, but what I really wanted to write about was some feeling of "information overload in general" I had.
Like, I thought to myself, "Oh, we're being bombarded with too much information, and like we're using youtube and social media so much and we shouldn't use it as much."
I think it was one of the reasons why I hardly use facebook anymore since starting at university (only use it to check on university pages). And I'm not for other social media either. Not sure if it's just natural for my age, or I'm just busy with university or my computer graphics hobbies.
Looking back at that though, I really think that's mostly incorrect and negative. With internet especially, it's always good to have a lot of information at hand. Especially for news. I'm focused a lot of programming, it's good to have quick access to check on world events once in a while. Whether for fun or for serious purposes, it's great I can view all this on just one computer. And social media's a great way to connect with others. Back pre-internet era, if someone moved or changed address/phone numbers, it'd be hard to keep in touch if they don't tell their friends about it. Though I can't say for certain, I didn't live in that time (technically though haha, when I was really young my family didn't have internet though. And when we started, it was w/ kilobit speeds and DSL, if I recall the terms right). With things like facebook and Skype, you just send a message to stay in touch, you don't even need to consider networking, just get a good internet connection. Besides social media, I've gotten a lot of help from forums, especially with OpenGL and Windows API, and I'm really thankful for that. I'd like to give back to them one day.
So I think my thoughts on what I thought was "information overload and society" are more like "my thoughts about what I'm doing on the computer and what I should moderate for myself", and "advice tips I wanted to list from that". Basically, my thoughts are more of personal reflection now that I think about it. With YouTube, I use it a lot on my phone, mostly for watching let's plays when I wanna give my head a break. (Currently, I'm rewatching MegamanNG's Phoenix Wright: Justice for All walkthrough. On Part 9 as I'm writing this.) As I'm writing this, I'd have to say to myself to remind myself once in a while not to take content like this for granted. Not just let's plays. Any video in general. Of course I'm gonna forget this a lot, I'm busy with life in general. So most importantly, I'd say to myself not to overload with too much of YouTube. I'd say focusing more on my hobbies and interests have makes me happier in the long run. Really, doing personal projects on Windows API and OpenGL is really cool, at least for me. I'd like to try ray tracing one day, and maybe even computer vision. I hope I do more team projects (teaming up in programming is hard from my experience, but I'd like to get better at it. I think team projects is a good thing, and feels better in the long run too).
Anyways, ya, I guess in the end, these ending thoughts would be more personal reflection. I'd like to share it publicly on a blog though just because I feel like it, and I'd also like to share tips I've felt like I've gained from my experience with using the computer a lot. If I'd have any concern about society in general with the idea of "information overloading", I just hope the level of work expected in schools and work don't go overboard just because we have more information, but other than that, this is mostly self reflection.
Tips in the end:
-It's always good to have a lot of information and tools. Just don't overload yourself.
-Pursue your hobbies/interests. Make your own content. I'd say the more you do this, the more you can understand to value what you can do/what you have.
----------------
Ending Notes
-looks like tips I put here match up similarly to a previous reflection I did. was nice coincidence haha, didn't do that on purpose
-Speaking of YouTube, I've been thinking about YouTube demographics. Looked this up, looks like men are mostly into sports and games. I wonder if YouTube's algorithms take this into effect when recommending videos to me. I see sports/games videos a lot in my recommended list. Though it could also be that I just looked a lot of these types of videos up naturally, and YouTube considered that. Just wanted to note that here.
I had that for a while now after last university quarter as a freshman. I'd just finished a linear algebra class, my last writing class, and an intermediate python programming class. And to really emphasize it, that was my last official general writing class. Looking at the course catalog, I think I'm required to take an "upper division computer science writing class", but other than that, that was in a sense my last writing class I'd ever have to take in life.
Anyways, I'm being vague about the class details, sorry, but I want to focus on my thoughts on the end of the quarter. My last writing class's focus was on "Argument & Research". Apparently, at the end of the quarter and my first freshman year, I was having thoughts about being information overloaded. Like, I was thinking to myself, "Isn't taking ~3 to 4 classes per 10 week quarter to graduate a tiny bit too much?" It's a lot of information to digest and think about, in my opinion. Though I did well in all my classes last quarter, I'd often think to myself that 3 to 4 classes in that time span is a little bit much to ask.
And I'd have thoughts about what if the university requirement was lowered so that you could pace yourself to around 2 to 3 classes per quarter to graduate. Put less stress on yourself, dedicate more time to the content of classes, allow students to pursue their own interests. I think that the more you encourage people to pursue their own interests, the more it'll benefit them in the long run, and I think that'll make for a better education (and better life accomplishments in general).
Looking back at it more, I'd say even middle school and high school were more content packed, at least from my experience. I remember doing a lot of worksheets and projects, like --a lot-- of them, really. I mean, the subjects were interesting. Going off the top of my head, I took classes about life science, algebra 1 and algebra 2. Band elective in middle school. Art in high school. Spanish 1-2 and Spanish 3-4 in high school. They were interesting, but keeping up with them was really hard. That was like, 6 - 8 subjects per week, looking back at a high school calendar pdf I scanned. Like 3 classes on a Monday, the other 3 on a Tuesday, and with homework. (And also, summer reading! I just wanted to take a break, but in middle school and high school, had to read a book and do a report over the summer. Just wanted a full break then though!)
So alright, now that I think about it, I do see my university schedule as more flexible than my middle school and high school one. Like, a lot. I guess I also feel more flexible since I dorm around the campus. So yes, I am thankful for the change of pace from high school to university. But nonetheless, I'd argue that multitasking with at least 3 to 4 classes is a little bit over the top, regardless of type of schooling, if someone wanted to seriously study all those subjects.
However, I do realize that dropping the amount of classes can have a lot of cons too. People could feel less motivated. And at least in the university, professors and staff may have thought a long time on how courses should be structured or the content they want to present to a student taking a certain major, like Biology or Computer Science. So they can be justified in course rigor. Also, having various classes would help someone gain breadth, knowledge-wise. Like, gaining familiarity with both art and math could be pretty beneficial if someone wanted to be well-rounded.
Anyways, it's hard to remember my feelings about how school was back in middle school, high school, and last freshman year. I just remember feeling a little bit troubled by how much info. I'd have to process with multiple classes. I did genuinely think about course content, (and especially with comp. sci. now!). In middle school and high school, I may have try-harded a lot on my assignments, I can admit that. I did have a few extracurricular activities in middle school and high school. And I may have procrastinated a lot too (but not always!). So all-in-all, it's hard to say right now whether the bigger problem is how much school work is presented, or how much I want to spend on it. Maybe it's equally both. If I were to write more about this, it'd have to be while I'm back in the full university quarter next month.
Nonetheless, what I really feel for sure is that, being at the university I'm at right now, I get more free time to pursue my computer graphics interests, and I'm extremely happy to do that. As long as I get to devote most of my time to that, I'll be happy with any workload.
------
Alright, I ended up writing a lot about my thoughts of school and workload, guess wanted to put my thoughts fully there, but what I really wanted to write about was some feeling of "information overload in general" I had.
Like, I thought to myself, "Oh, we're being bombarded with too much information, and like we're using youtube and social media so much and we shouldn't use it as much."
I think it was one of the reasons why I hardly use facebook anymore since starting at university (only use it to check on university pages). And I'm not for other social media either. Not sure if it's just natural for my age, or I'm just busy with university or my computer graphics hobbies.
Looking back at that though, I really think that's mostly incorrect and negative. With internet especially, it's always good to have a lot of information at hand. Especially for news. I'm focused a lot of programming, it's good to have quick access to check on world events once in a while. Whether for fun or for serious purposes, it's great I can view all this on just one computer. And social media's a great way to connect with others. Back pre-internet era, if someone moved or changed address/phone numbers, it'd be hard to keep in touch if they don't tell their friends about it. Though I can't say for certain, I didn't live in that time (technically though haha, when I was really young my family didn't have internet though. And when we started, it was w/ kilobit speeds and DSL, if I recall the terms right). With things like facebook and Skype, you just send a message to stay in touch, you don't even need to consider networking, just get a good internet connection. Besides social media, I've gotten a lot of help from forums, especially with OpenGL and Windows API, and I'm really thankful for that. I'd like to give back to them one day.
So I think my thoughts on what I thought was "information overload and society" are more like "my thoughts about what I'm doing on the computer and what I should moderate for myself", and "advice tips I wanted to list from that". Basically, my thoughts are more of personal reflection now that I think about it. With YouTube, I use it a lot on my phone, mostly for watching let's plays when I wanna give my head a break. (Currently, I'm rewatching MegamanNG's Phoenix Wright: Justice for All walkthrough. On Part 9 as I'm writing this.) As I'm writing this, I'd have to say to myself to remind myself once in a while not to take content like this for granted. Not just let's plays. Any video in general. Of course I'm gonna forget this a lot, I'm busy with life in general. So most importantly, I'd say to myself not to overload with too much of YouTube. I'd say focusing more on my hobbies and interests have makes me happier in the long run. Really, doing personal projects on Windows API and OpenGL is really cool, at least for me. I'd like to try ray tracing one day, and maybe even computer vision. I hope I do more team projects (teaming up in programming is hard from my experience, but I'd like to get better at it. I think team projects is a good thing, and feels better in the long run too).
Anyways, ya, I guess in the end, these ending thoughts would be more personal reflection. I'd like to share it publicly on a blog though just because I feel like it, and I'd also like to share tips I've felt like I've gained from my experience with using the computer a lot. If I'd have any concern about society in general with the idea of "information overloading", I just hope the level of work expected in schools and work don't go overboard just because we have more information, but other than that, this is mostly self reflection.
Tips in the end:
-It's always good to have a lot of information and tools. Just don't overload yourself.
-Pursue your hobbies/interests. Make your own content. I'd say the more you do this, the more you can understand to value what you can do/what you have.
----------------
Ending Notes
-looks like tips I put here match up similarly to a previous reflection I did. was nice coincidence haha, didn't do that on purpose
-Speaking of YouTube, I've been thinking about YouTube demographics. Looked this up, looks like men are mostly into sports and games. I wonder if YouTube's algorithms take this into effect when recommending videos to me. I see sports/games videos a lot in my recommended list. Though it could also be that I just looked a lot of these types of videos up naturally, and YouTube considered that. Just wanted to note that here.
Thursday, August 3, 2017
Using WS_CLIPSIBLINGS and WS_CLIPCHILDREN in OpenGL drawing
I've been looking back at a Windows API minimal.c example from here to review OpenGL, and I noticed in that the CreateWindow funciton included the WS_CLIPSIBLINGS and WS_CLIPCHILDREN styles like so:
At first thought, that seemed unnecessary to me, as I thought that you'd only include that if you want to prevent a window from drawing onto siblings (with the same parent) or its own child windows. But I think that's the point, you don't want OpenGL to ever draw on those other windows.
Haven't tested it with full code yet, but pretty sure it's right, and I'd thought it'd be helpful to point it out in a blog post like this. Got some info. from this pdf titled "3. OpenGL Under MFC" (I use pure Windows API though, but doesn't matter overall haha.)
    hWnd = CreateWindow("OpenGL", title, WS_OVERLAPPEDWINDOW |
   WS_CLIPSIBLINGS | WS_CLIPCHILDREN,
   x, y, width, height, NULL, NULL, hInstance, NULL);
At first thought, that seemed unnecessary to me, as I thought that you'd only include that if you want to prevent a window from drawing onto siblings (with the same parent) or its own child windows. But I think that's the point, you don't want OpenGL to ever draw on those other windows.
Haven't tested it with full code yet, but pretty sure it's right, and I'd thought it'd be helpful to point it out in a blog post like this. Got some info. from this pdf titled "3. OpenGL Under MFC" (I use pure Windows API though, but doesn't matter overall haha.)
Monday, July 10, 2017
VAIO Care filling my hard-drive
A while ago, my computer was running out of hard drive space. Had 500 GB. Found that odd, I was pretty sure I wasn't adding any big files. Even downloads shouldn't have eaten up GB's so quickly.
I used WinDirStat to check files. Found a folder that was bloated with around 30-50 GB. Forgot what it was (wanted to write about this, just forgot). Was one of the folders found in:
C:\Program Files\Sony\VAIO Care
Not the VAIO Care folder itself. But one of the subdirectories. Noticed VAIO Care was doing hidden routine checkups or something and storing some data files or something in this folder. Was racking up huge. Deleted all of them, laptop still okay.
Wanted to stop this routine stuff from VAIO Care, didn't use it anyways. Found that I had to go to Explorer. Right click on "This PC", click "Manage".

I disabled all the VAIO Care scheduled tasks. In the tree browser on the left of the Task Scheduler, I went to:
Computer Management (Local) -> System Tools -> Task Scheduler - > Task Scheduler Library -> Sony Corporation -> VAIO Care
I highlighted all the tasks, and clicked disable in the bottom left. If I remember right, some tasks I had to single click and disable. Anyways, after that, the folder I mentioned earlier stopped filling with report files.

So ya. File bloating. Don't like it. Just happy to figure the source.
I used WinDirStat to check files. Found a folder that was bloated with around 30-50 GB. Forgot what it was (wanted to write about this, just forgot). Was one of the folders found in:
C:\Program Files\Sony\VAIO Care
Not the VAIO Care folder itself. But one of the subdirectories. Noticed VAIO Care was doing hidden routine checkups or something and storing some data files or something in this folder. Was racking up huge. Deleted all of them, laptop still okay.
Wanted to stop this routine stuff from VAIO Care, didn't use it anyways. Found that I had to go to Explorer. Right click on "This PC", click "Manage".

I disabled all the VAIO Care scheduled tasks. In the tree browser on the left of the Task Scheduler, I went to:
Computer Management (Local) -> System Tools -> Task Scheduler - > Task Scheduler Library -> Sony Corporation -> VAIO Care
I highlighted all the tasks, and clicked disable in the bottom left. If I remember right, some tasks I had to single click and disable. Anyways, after that, the folder I mentioned earlier stopped filling with report files.

So ya. File bloating. Don't like it. Just happy to figure the source.
Subscribe to:
Posts (Atom)